Monday, January 30, 2012

My New York Style Pizza – Vegetarian


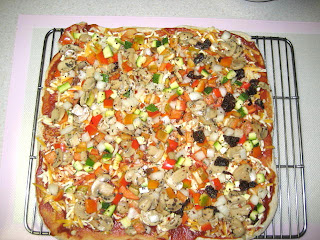
Even though I am dedicated carnivore, I just do not like pizza with any sort of meat product on it. It used to be that when I ordered pizza it had to be meat-eater special: bacon, ham, Italian sausage and of course solid layer of peperoni. If we wanted to eat pizza we had to go to pizza joint or order one. Well, how the times have changed! Now, the only pizza we eat is just what I bake: super thin crust (from a dough I made night before), the best tomato sauce (mine, of course made from my own grown-from-seeds tomatoes), mix of Italian cheeses that I grate (Provolone, Asiago, Parmigiano Regiano and Mozzarella). For toppings, it is just white or Vidalia onions, zucchini and red peppers chopped into 1/4” chunks and sliced cremini mushrooms, all in one thin layer. I like to see the cheese in between the vegetable toppings, only the mushroom slices are overlapping in second layer. Way back, I used to order Chicago style pizza from time to time but now I would have to be close to total starvation before I would touch this thing. Pizza? More like a casserole (just like Bobby Flay likes to say) or a stew on a wet bread.


 Perfect thin crust pizza.
Here is my time proven recipe. This pizza is just as good when reheated in a toaster oven as it is when served fresh. One very important note: don’t even bother to try to make thin crust pizza without pizza stone, it just will not work. Also, I always pre-bake my pizza and then dress it up, it makes the job of dressing the pizza so much easier and it gives the crust that a nice crunch! Also, make sure to dock the pizza dough with a docker or with a fork.
Another trick I have learned over time is to use wire cooling rack to put pizza on after it is pre-baked, it helps to keep bottom of the pizza to stay dry. Actually, it takes much longer to describe the whole process than it is to actually do it, but here it goes.
Dough
1-1/2 cup hard (bread) flour
1/2 cup whole wheat flour
1 tsp. fine sea salt
1/2 tsp. sugar or honey
1 T. olive oil
1-1/4 tsp. instant yeast (or heaping teaspoon)
Up to 3/4 cup warm water 
Pulse all the dry ingredients in food processor with steel blade attached.
Turn the machine on and drizzle in olive oil through the feed tube and then slowly add 1/2 cup tepid distilled water. Keep the machine running for about 30 seconds and then start adding more water one teaspoon at the time until the dough is one smooth ball whirling around. When the dough clears the side of bowl, you are done. Remove the dough to floured board and shape into smooth ball. Place in bowl thinly coated with olive oil, cover with plastic film and place in warm, draft free place. Better yet, let the dough rest in cool place overnight.
Assembly and baking
Preheat oven with pizza stone placed on bottom shelf to 500 °F, it will take about half an hour.
Roll out and stretch the pizza dough on floured countertop until the dough is 1/4” thick. Let the dough rest while you prepare the toppings.
Have a sauce, cheese and veggies ready next to cooling wire rack.
When the oven is ready (and infrared thermometer reads 500 °F on pizza stone) slide your peal (that was generously floured first) under the pizza and carefully slide it on pizza stone. Make sure that pizza was docked before it goes into oven or you end up with supersized pita bread (see above) It happened to me first time I made it. Bake for only 3 minutes.
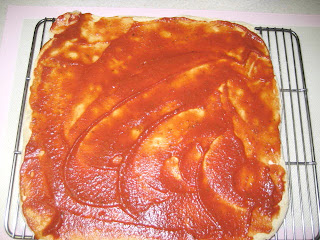
Remove from oven and turn over onto cooling rack with baked side facing up. Now is time to dress it up. Sauce goes down first in thin layer, then cheese and finally veggies. Mushrooms, if using, go on last. Slide pizza back on the peel (you may want to sprinkle a bit of flour first) and back to the oven for 10 minutes. Remove pizza from oven, cut into pieces and slide it back on cooling rack, it will prevent pizza bottom from getting soggy. When you look at the bottom you will notice how beautifully the dough is baked: nice caramelized blisters all over the bottom of your pizza pie.
Pizza is docked and ready for 3 minute pre-bake.

One side is baked, flipped over and ready for toppings...

starting with tomato sauce…

followed by cheese…

and finally the toppings.
In 10 minutes it will be ready!

Thursday, January 26, 2012

Pork Tenderloin Schnitzel and Mashed Potatoes


Mashed potatoes were actually creamy mashed Yukon and sweet potatoes with celeriac. It just happens that all three need same time to cook – 17 minutes once the water starts boiling. I mashed them with 1:1 ratio of 3% milk and 35% cream and a bit of butter. And, creamy they were!
For the schnitzel I used pork tenderloin that I sliced into 2” thick medallions and then I pounded them with heavy aluminum pan until they were evenly 1/4” thick. After they were seasoned with salt, pepper and hot Hungarian paprika they cooked in 5 minutes: 3 minutes on first side and another 2 minutes on the other side. In separate skillet, I caramelized onions and mushrooms and served them with potatoes and pork. Great meal that can be done in under 45 minutes, including all the prep. This is my all-seasons standby.

Tuesday, January 24, 2012

Mushrooms, Celery and Chicken Risotto


Since it was quite miserable outside I just felt for something comforting but light and some kind risotto filled the bill. I had one chicken breast, celery and Cremini mushrooms on hand so recipe was born. It is very similar to Chicken and Mushroom Risotto that I have posted earlier. It may seem like lot of mushrooms but the shrink to about 1/4 of its volume.
Risotto is very versatile meal. This time I cooked enough of it to have a lot for leftover. Next day I prepared Risotto Cakes and whit what was left I cooked risotto soup. I just used 1 part of risotto for 2 parts of chicken stock by volume. It tasted fantastic and the soup was done in 15 minutes! After all, everything was cooked already.

Ingredients
2 tsp. olive oil
2 Tbs. butter
2 1/2 cups fresh mushrooms, sliced
2 stalks of celery
2 skinless chicken breasts
3 shallots
4 garlic cloves, crushed
1-1/2 cups Arborio rice
1/2 cup dry white wine
Pinch of Saffron
4-1/2cups chicken stock (heated)
1/2 cup of freshly grated Parmigiano cheese
2 Tbs. chopped fresh parsley
Oil
Salt & pepper

 Directions
Slice the celery diagonally across into 1/8” slices. Chop the chicken breast into 3/8” pieces, sprinkle with sea salt and pepper and coat with 1 Tbs. of olive oil.
Heat up the chicken stock and keep hot.
Heat 1 tsp. of oil and 1 Tbs. of butter in skillet. Add mushrooms and toss to coat all slices. Cook till mushrooms show nice color (do not move them too much). Add celery and cook until it softens, about 3 minutes. Add the chicken pieces and cook for 5 – 7 minutes or until the chicken is almost cooked. Remove chicken, mushrooms and celery to a bowl and keep warm.
In the same skillet that you cooked mushrooms and chicken, sauté shallots and garlic in remaining butter and oil until shallots are translucent. Add the rice and stir until the rice turns opaque, about two minutes.
Add the wine to the rice and stir frequently until the wine has been absorbed into the rice.
Add 1/2 cup of the heated chicken stock and stir until absorbed. The rice and stock should bubble gently.
Continue to cook the rice, adding chicken stock 1/2 cup at a time, scraping the bottom of skillet continuously, and allowing the rice to absorb the stock before adding the next 1/2 cup. Taste for seasoning and adjust.
With the last addition of stock return chicken, mushrooms and celery to the skillet and sprinkle with half of Parmigiano cheese.
Cook rice, scraping the bottom of skillet continuously, until al dente, about 25-30 minutes. Remove from heat when the risotto is thick and creamy.
Serve on pre-heated plate or bowl and garnish with freshly grated Parmigiano and parsley. Serve immediately.

Monday, January 23, 2012

Pork Balls and Noodle Soup


Gung Hay Fat Choy - Happy New Year!

It is a year of a Dragon and I started it with a big bowl of pork balls and noodle soup with a lot of vegetables for breakfast. I bought Vietnamese Pork balls in Chinatown, even Vietnamese and Chinese don’t make these meat balls at home so neither did I. It is very simple to make. The noodles are cooked separately in a pot with salted water and placed in bottom of soup bowl. While the stock was simmering with the pork balls I chopped garlic and ginger and add it to soup, then I julienned carrots, sliced celery stalk, cut up some broccoli flowerets, sliced Napa cabbage leaves and chopped 2 green onions for garnish. All the vegetables were dropped into soup together, brought back to boil and ladled on top of noodles. The soup was seasoned with soy sauce, sesame oil and freshly ground white pepper. All done in under 20 minutes. For noodles I used Chinese dry egg noodles. When they are boiled thy stretch to about 18” long. This soup must be eaten with spoon and chopsticks.

Friday, January 20, 2012

Chinese New Year of a Dragon is Coming!

Next week on January 23rd Chinese everywhere will celebrate arrival of new year with incredible banquets and I will join in the fun but at home. We are long way from closest Chinatown, unfortunately. I made lot of potstickers and on the New Year’s day I will prepare something special.


 Ready for the freezer.

Thursday, January 19, 2012

Pork Pot Stickers


The pot stickers are another dim-sum favorite snack and uses basically same ground pork mixture as Shu-Mei steamed dumplings and steamed Pearl Balls. It is very tedious to make so typical Chinese family do not make them at home, but I have no choice, there are no dim-sum restaurants in our town. I don’t mind even though as a full meal it takes me about half an hour to make them, another 15 minutes to cook them and then just few minutes to eat them all. C’est la vie.

Ingredients

3/4 pound pork butt or equivalent ground pork
1/2 Tbs. fresh ginger, minced
1/2 cup finely chopped Napa or Savoy cabbage leaves
2 tsp. chopped garlic
1 tablespoons water chestnut, finely chopped
3 green onions, minced
2 shitake mushrooms, soaked and chopped fine
1 Tbs. Sake or rice wine
1 tsp. soy sauce
1 tsp. sesame oil
1/2 teaspoon salt

1/2 tsp. white pepper
1 tsp. sugar
1 Tbs. cornstarch
Won-ton wrappers
Bowl with water for sealing the dumplings

Directions
Mix all the ingredients except the wrappers, cover and refrigerate for 2 hours to blend the flavours.

1.     Spoon 1 heaping teaspoon of the filling onto a dumpling wrapper. Don’t be tempted to overfill! Dip your finger into the water and “paint” all around the edges of the dumpling skin.
2.     In the middle, pinch the top and bottom together, tightly.
3.     Starting just left of the middle, use your left hand to bring the TOP portion of wrapper to pleat towards the middle. Pinch to secure that pleat. Move down just a bit, and do the pleating again. Repeat once more. You will have 3 pleats on each side, all pleats pointing towards the middle.
4.     Now, it’s time to do the right side. Do the same using only the top portion of wrapper. Pleat towards the middle, or to the left. Repeat 2 more times.
5.     Finish by pinching the pleat all around one more time with your thumb and lower portion of your finger. Remember, any unsealed section will cause the potsticker to leak filling!
 
To cook the potstickers, pour about 2 tablespoons of oil into a non-stick frying pan over medium heat. When hot but not smoking, carefully place the dumplings in frying pan, flat side down, not touching each other. Do not crowd too much or they will not brown. Fry the dumplings in batches for 4 to 5 minutes, until the bottoms are nicely browned.
Add 1/4 cup (65 ml) of water and immediately cover to start the steaming process. Steam for 3 to 4 minutes. Remove the lid and let the rest of the water boil off and re-crisp the bottoms, about 1 minute. Cut open one of the dumplings and make sure the inside meat is cooked. Before starting your next batch, wipe the frying pan clean before adding more cooking oil. Adjust amount of water and steam time for the next batch as needed.

Check this website for clear illustration on folding the potstickers

Ready for cooking. Little bit too crowded for comfort but we were hungry!


Tuesday, January 17, 2012

Chinese Style Sticky Pork Back Ribs


These sweet, spicy and sticky ribs are so addictive! I didn’t feel like making a real Char Sui sauce so I just mixed oyster sauce, hoisin sauce, buckwheat honey, garlic and Sriracha sauce. My “official taster” didn’t say a word during meal, she was so busy eating and chewing the ends of bones (the best part!). This is such an easy no-fuss meal to make: there is no chopping (garlic press does the work), no stirring, no standing over the stove…no work.

Ingredients
1 side of pork back ribs
1/3 cup Oyster Sauce
1/3 cup Hoisin Sauce
1/3 cup Buckwheat honey or other dark honey
2 tsp. Sriracha Sauce
2 tsp. crushed garlic 

Directions
Remove the membrane from bone side of ribs and pre-cut rib sections on meat side about half way. Mix all ingredients and rub the marinade on all sides of ribs. Place in resalable bag, remove as much air as possible and refrigerate for at least 4 hours or overnight.
Preheat oven to 350 °F. Bring ribs to room temperature. Remove the ribs from bag and place them bone side down on a sheet of aluminum foil large enough to make a bag with second sheet of foil on top. Reserve the leftover marinade. Seal the edges by folding them over several times, place on baking sheet and bake in middle of oven for 2 hours. After 2 hours cut diagonal slots from corner to corner and fold open so that ribs are completely exposed. Brush on remaining marinade, increase oven temperature to 400 °F and bake until the meat is golden brown.

Monday, January 16, 2012

Cream of Curried Broccoli and Asparagus Soup

This is one of my favorite “healthy” soups. Never mind the cream, the amount per serving is miniscule. I usually use only stems of asparagus, the spears go into omelet or other dishes even though I did use it as a garnish on occasion.

 Ingredients
1 onions, chopped
1/2 carrot, peeled and chopped
3 tablespoons butter
4 cups broccoli stems and flowers, chopped coarse
1/2 cup of asparagus stems, finely chopped
1 tsp. garlic, chopped
1 baking potato, peeled and chopped
6 cups chicken broth
1 tsp. curry powder
1/2 cup light cream 

Directions
Cook onions and carrots in butter over moderate heat, stirring, for 4 minutes.
Stir in curry powder and garlic and cook for 2 minutes.
Add broccoli, asparagus, potatoes and stock and season to taste.
Simmer mixture, covered, for 30 minutes.
Puree mixture with immersion blender until very smooth.
Add cream and heat over low heat.

Serve in preheated soup bowls and garnish with broccoli flowerets and croutons or toasted baguette slices. For better taste rub garlic clove on toasted baguette slices.

Saturday, January 7, 2012

Crispy Skin Salmon with Asparagus


Anybody that follows my blog knows by now that we love salmon prepared in any which way. After all, this is 19th post featuring salmon! As is the case with many salmon dishes the prep takes a lot longer than actual cooking. I always cook my rice an automatic rice cooker so I usually start with washing the rice. By the time the rice is done, about 25 minutes, the meal is ready to be plated.

Start by preparing the sauces. In this version I served wasabi-mayonnaise sauce made by mixing 2 tsp. of wasabi paste with 3 Tbs. of mayonnaise. Second sauce is simplified teriyaki sauce: 2 Tbs. Kikkoman soy sauce, 2 Tbs. sake and 2 Tbs. dark honey (I prefer buckwheat honey) or maple syrup. Mix until well combined.
Besides rice, the other sides are:
1)    Seedless cucumber slices cut in half and pickled in mix of 1 tsp. of rice vinegar and 1 Tbs. of dark honey. Let marinate in bowl and then drain in colander just before serving on same plate as salmon and asparagus.
2)    Asparagus cooked in microwave for 1 minute on high, tossed with butter and then sprinkled with coarse sea salt and freshly ground white pepper.

Since I serve the salmon with crispy skin (the best part of whole dish) the skin must be completely free of scales, and I mean not a single scale regardless how small it is. Scaling the fillet is by far the most tedious job that takes most of the prep time. But, once done it takes just 4 – 5 minutes to cook the salmon.

Start by heating non-stick frying pan on high with 1 tsp. of peanut oil and 1 tsp. of sesame oil. When light smoke forms above the pan carefully place the fillets skin side down. Cook on high until you see about 1/4 of the fillet above skin turning from pink to creamy color. Lower heat to medium high and turn fillet on flesh side down. Continue cooking till about 1/4” of the flesh in middle is still pink. Add the “teriyaki” sauce and reduce for 30 seconds. Remove the salmon immediately to preheated plate skin side up, pour wasabi-mayo sauce next to fillet followed by reduced teriyaki sauce. Place the asparagus and drained cucumber salad on plate and serve. The skin comes off in one straight and crispy piece. What a treat!

Thursday, January 5, 2012

Big Breakfast at Night


I have posted similar “All Day Breakfast” before but it is so good that it is worth to post another version.
As I noted before, this meal is a snap to make in restaurant or diner environment with their big steel hot plate and deep fryer always at ready but at home it involves quite a juggle act and few utensils. However, this time I cut it down to just one small sauce pot for canned maple syrup beans even though they could have been heated up in microwave oven and one large (12” flat bottom) non-stick frying pan that comfortably cooked 3 pineapple rings cut in half, 2 thick slices of smoked ham, 3 large cremini mushrooms cut in half and 3 eggs (scrambled). Frozen and seasoned potato quarters were crisped up in toaster oven. From start, including all the prep, to plating in under 30 minutes, a lot faster than my previous version and a definite repeat. That big frying pan was a huge asset and so was the fact that ham, pineapple and mushrooms could be cooked on same heat and at the same time and that the eggs were scrambled just at very end in the same pan. Of course, I had to move the ham, pineapple and mushrooms to one side.

Sunday, January 1, 2012

Chicken Breast with Vegetables and Noodles


After all the comfort food that I have cooked over the Christmas it was about time to come up with something light. I had some vegies left over from our traditional Friday night thin crust veggie pizza and a chicken breast so I had lot of choices as to how to prepare it. In the end I settled on sort of sauté with wide egg noodles. I had parts of white onion, zucchini, red and green peppers, cremini mushrooms and Roma tomatoes, excellent base for a sauce. At the end just before plating I stirred in a bit of balsamic vinegar and large pinch of dried basil (from my garden). Freshly grated Parmigiano and sprinkle of chopped parsley on top finished the plate.

 
Ingredients
1-1/2 cups of julienned red and green peppers and zucchini
1-1/2 cups sliced mushrooms and onions
1 cup chopped Roma tomatoes
1 chicken breast cut into strips and tossed with salt, pepper, hot pepper flakes and olive oil
1/2 cup Marsala wine
1 Tbs. Balsamic vinegar
1 tsp. dry basil

Spread the chicken breast strips in hot non-stick frying pan and cook for about 3 minutes on each side. Remove to preheated bowl or plate and place into 250 °F toaster oven. Cook noodles, toss in butter and keep warm.

 In same frying pan add 1 Tbs. of olive oil and sauté mushrooms and onions until lightly colored, about 5 minutes.
 Add julienned zucchini, peppers and tomatoes, stir and cook for 5 minutes, covered. Remove cover and stir in Marsala. Cook uncovered until the sauce thickens. Stir in balsamic vinegar and basil.  
Mix in previously cooked noodles and toss so that all the noodles are coated with sauce. Serve on preheated plates or shallow bowls, place chicken strips on top and sprinkle with cheese and chopped parsley.